


Wireless performance depends on the complete product around a module. DOIT’s manuals repeatedly connect antenna placement, nearby metal and host-board layout with radio performance. Choosing a PCB antenna or an external antenna therefore belongs early in the mechanical and electrical design process.
Identify the actual antenna arrangement
| Documented example | Integrated antenna choice | External antenna choice |
|---|---|---|
| Original ESP32 family | ESP32-32E | ESP32-32UE or ESP32-32SE |
| ESP32-C3 family | ESPC3-12 | ESPC3-12E |
| ESP32-C5 family | ESPC5-32 | ESPC5-32E |
| ESP32-C6 family | ESPC6-32 | ESPC6-32E |
| ESP32-S3 family | ESPS3-32 | ESPS3-32E |
Suffixes are useful only within the documented model family. For example, ESP32-32E is a PCB-antenna module, while ESPS3-32E uses an external connection. Read the ordering table, antenna section and mechanical drawing for the exact part rather than treating one letter as a universal rule.
Give a PCB antenna its required clearance
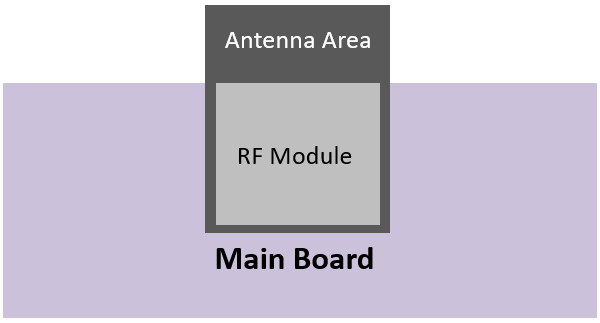
The ESPS3-32 manual illustrates placing the antenna region beyond the edge of the host board. It also describes alternative arrangements that clear the area beneath the antenna. The practical objective is to keep the radiator away from host-board copper and nearby conductive structures, using the dimensions and layout rules in the selected manual.
Review all layers of the host PCB in that region. Include the enclosure, display frame, batteries, mounting hardware and wiring in the mechanical review. A clearance that looks acceptable in a bare-board drawing can disappear once the product is assembled.
Plan the entire external antenna assembly
An external connector lets the radiator occupy a different location from the module. That can help when the module must sit inside a crowded board area, but the antenna still needs a suitable environment. Specify the connector, cable length, routing, mounting and radiator as an assembly.
For a dual-band ESPC5 design, check that the chosen antenna assembly covers the intended 2.4 GHz and 5 GHz operation. Do not assume a component selected for a 2.4 GHz module automatically meets a dual-band requirement. Test the antenna in the final mounting position.
Check power before diagnosing every failure as RF
Several C-series and S3 manuals warn of current peaks above 500 mA during startup RF calibration. A weak supply or excessive rail drop can therefore interfere with bring-up even when antenna placement is reasonable. Observe the supply at the module during startup, connection and transmission, and compare it with the selected module’s electrical limits.
Use the full pin definition to confirm enable, reset and boot configuration. Keep firmware download access available, and verify that application circuitry does not force an unintended startup mode. These checks make wireless problems easier to isolate during prototype testing.
Approve the assembled configuration
- Record the exact module and memory suffix, antenna assembly and PCB revision.
- Measure power behavior during startup and representative radio traffic.
- Evaluate connection and data transfer at intended locations and orientations.
- Repeat the test with the enclosure, cables and other electronics installed.
- Document the tested firmware and antenna placement so production can reproduce the setup.
The most useful module choice is the one that fits a verified complete design. Antenna clearance, supply stability and reproducible assembly should be reviewed together before releasing the host board.
Source: Supplied DOIT user manuals for the models discussed.
Leave a Reply
You must be logged in to post a comment.